Getting started with Membership
The Unyson+ Membership extension turns a WordPress site into a membership site: people join a plan, and access rules decide which pages, posts, downloads and courses each plan opens. Everything lives in your own WordPress database, and when you sell plans you take the money with your own payment accounts.
This page takes you from nothing to a working members area. As an example we will build the fictional Larkspur Garden Club: a free plan for newsletter readers and a paid Member plan that opens the members-only gardening articles. Plan on about half an hour.
:::tip New to memberships? Three words cover nearly everything:
- A plan is what someone joins: "Free", "Member", "Pro". It can have prices and an end date.
- A membership is one person holding one plan, with a status (active, cancelled, ended…) and dates.
- An access rule says what is protected, which plans may see it, and what everyone else sees instead. :::
1. Turn Membership on
- In WordPress, open Unyson+ → Extensions.
- Find Membership, download it if it is not on your site yet, and click Activate.
- A new item appears: Unyson+ → Membership. Click it.
Membership opens as an app of its own, with its own sidebar and top bar. Switching the extension off later never deletes anything: your plans, members and rules wait until you switch it back on.
2. Find your way around the app
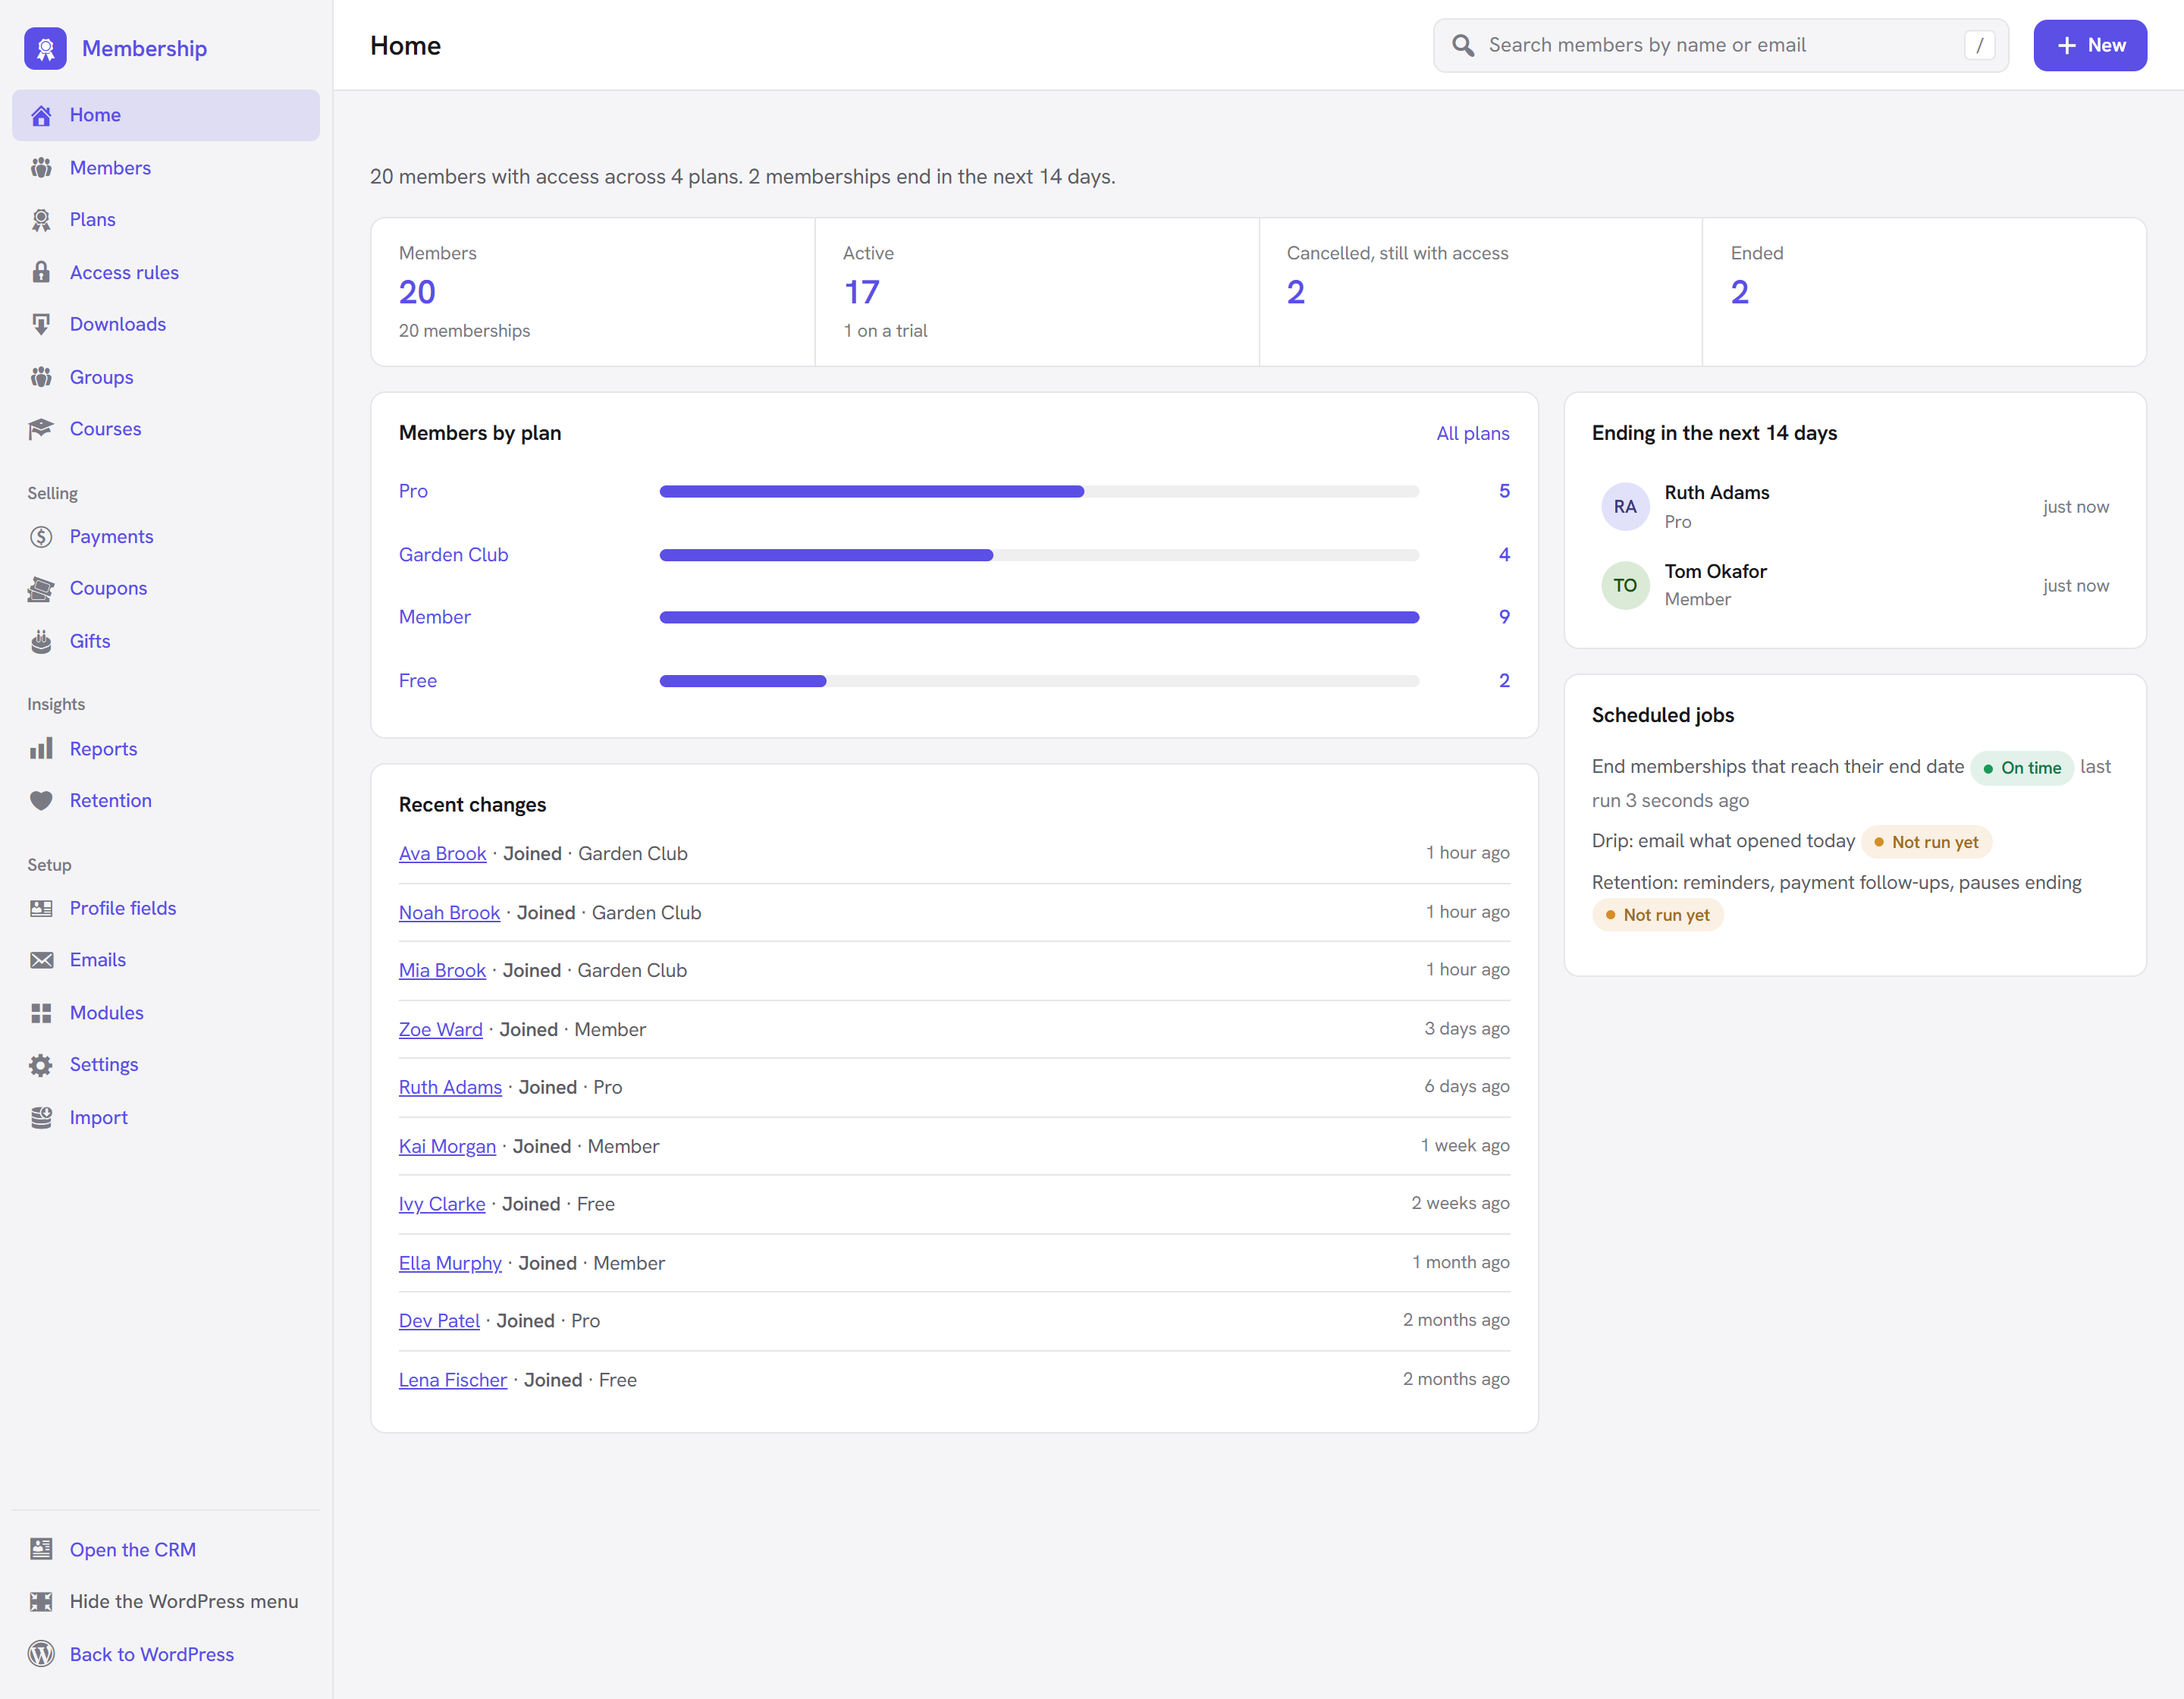
The sidebar lists every area of Membership, in four groups:
| Group | Items | What they are for |
|---|---|---|
| (top) | Home, Members, Plans, Access rules | The core: always there. Downloads, Groups and Courses join this group when you switch on the Protected downloads, Groups and teams, and Courses modules. |
| Selling | Payments, Coupons, Gifts | Taking money. Each needs its module (Payments, Coupons, Gift memberships). |
| Insights | Reports, Retention | Numbers and keeping members. Need the Reports and Retention modules. |
| Setup | Profile fields, Emails, Modules, Settings, Import | How the site behaves. Import needs the Importers module. |
Payments, Coupons and Reports are always listed. While their module is off they carry an Off badge, and opening one shows "Payments is switched off" (or Coupons, Reports), what the area does, "Switch on the … module to use it." and an Open Modules button. The other module items (Downloads, Groups, Courses, Gifts, Retention, Import) only appear once their module is on. See Modules.
At the bottom of the sidebar:
- Hide the WordPress menu removes the WordPress admin menu while you work in Membership (click Show the WordPress menu to bring it back; your choice is remembered).
- Back to WordPress returns to the dashboard.
- Open the CRM appears when the Unyson+ CRM is active.
The top bar has a search box (Search members by name or email; press / to jump to it) and a New menu with Add a member, Plan and Access rule.
On a fresh install, Home shows three first steps (create a plan, add your first member, choose your modules) instead of numbers. See The Home screen for every card.
3. Create your first plans
Start with two plans: a free one and a paid one.
The Free plan
- Open Plans and click New plan (or New → Plan in the top bar).
- Name:
Free. Leave Slug empty; it is made from the name. - Description: "Our newsletter and the public articles."
- Do not add a price. A plan without prices is free.
- Under How long it lasts, keep Until it is cancelled (or for as long as it is paid).
- Click Create plan.
The Member plan
- Click New plan again. Name:
Member. - Under Prices, click Add a price. Fill in Label
Monthly, Amount8.00, CurrencyGBP, Billing Every month, Every1. - Click Add a price once more for the yearly price: Label
Yearly, Amount80.00, Billing Every year. - Keep Until it is cancelled (or for as long as it is paid).
- Click Create plan.
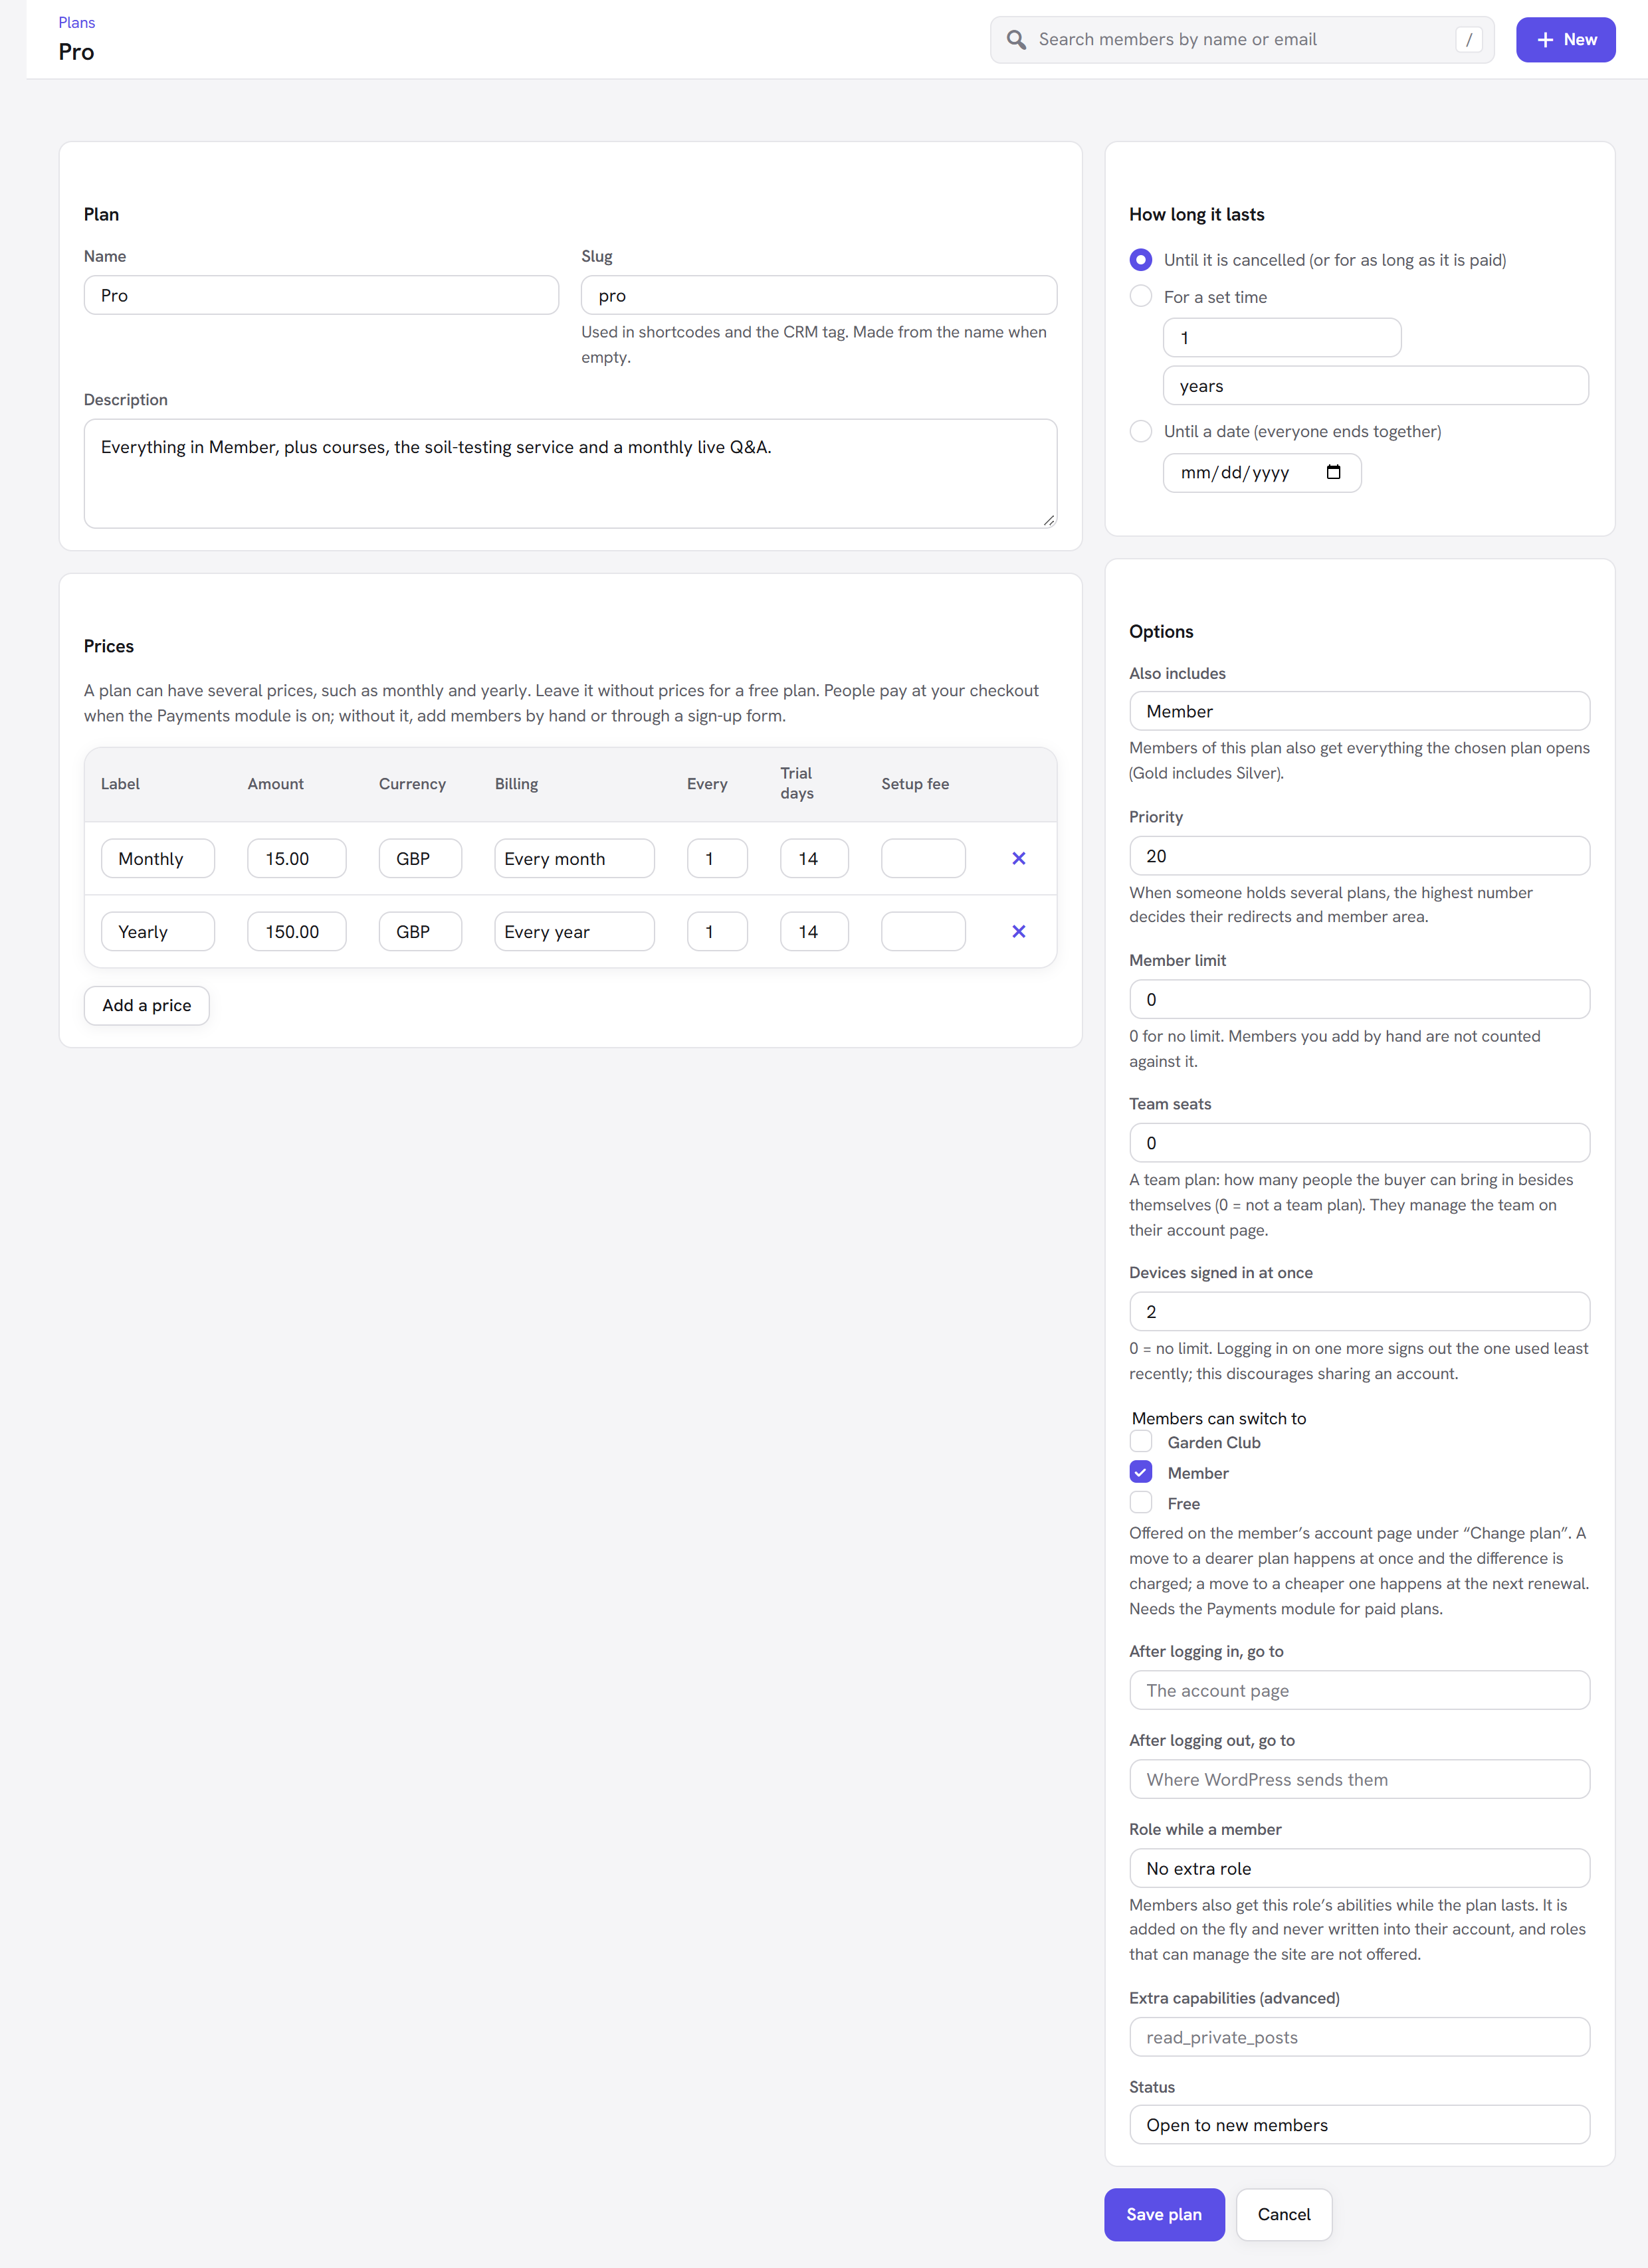
Later you can add a Pro plan with Also includes set to Member, so Pro members get everything Member opens and more. Every field is explained in Plans.
4. Create the member pages
Members need somewhere to log in, somewhere to manage their account, and (when you sell plans) somewhere to choose and pay. You build these pages yourself in the page builder, so they look like the rest of your site. The Membership elements are in the Membership tab of the page builder's element list.
The login page
- Create a page called Log in (Pages → Add New) and open it in the page builder.
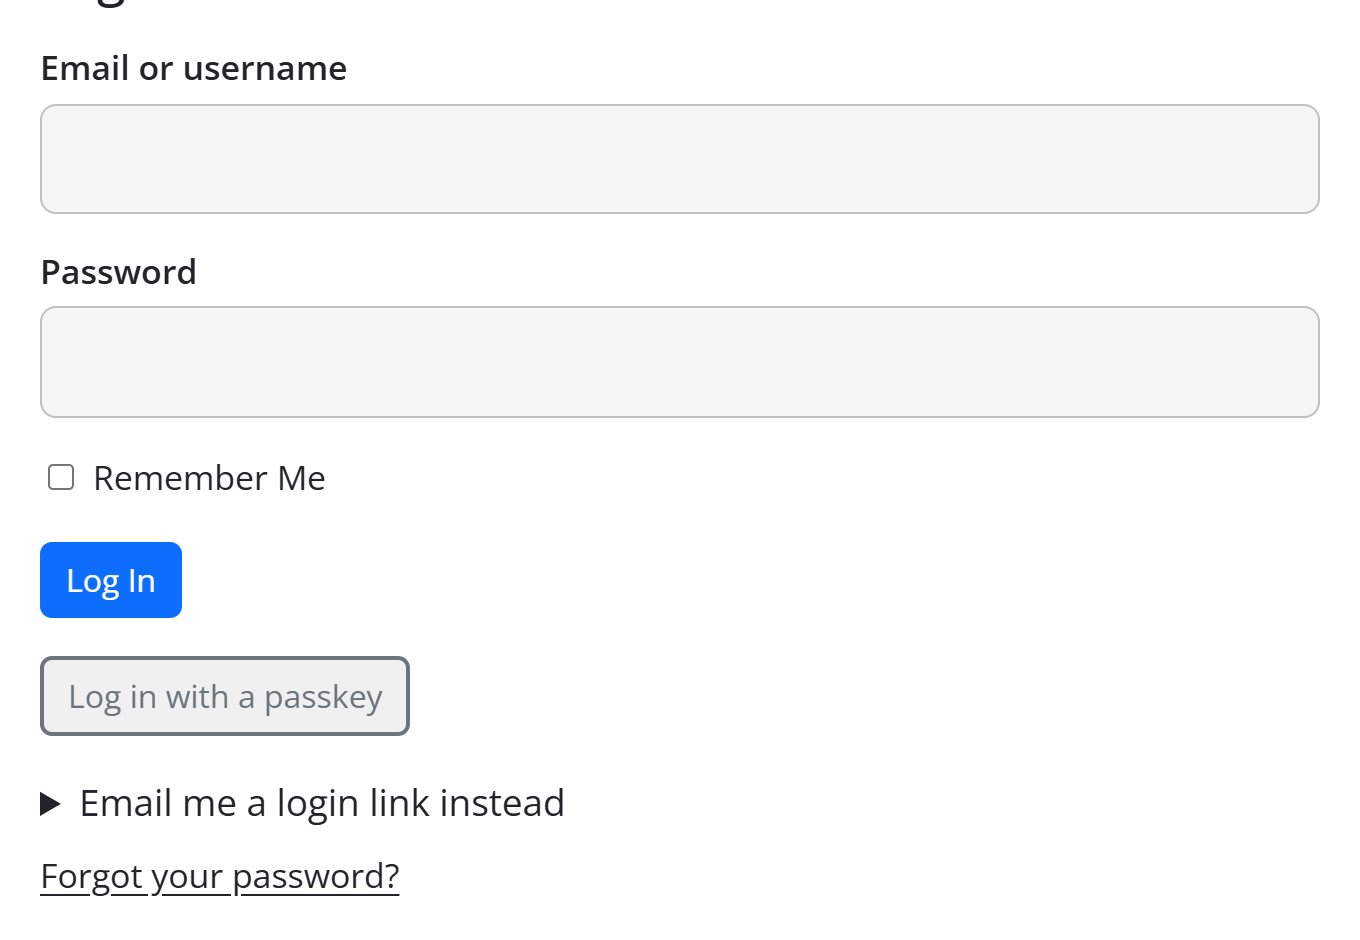
- Add the Member Login element. Its defaults are fine: a "Log in" title, "Remember me", "Forgot your password?", and after logging in members go Where the member's plan says (else the account page).
- If you have a sign-up page, put its address in Sign-up page so the form shows "Not a member yet? Join".
- Publish the page.
The account page
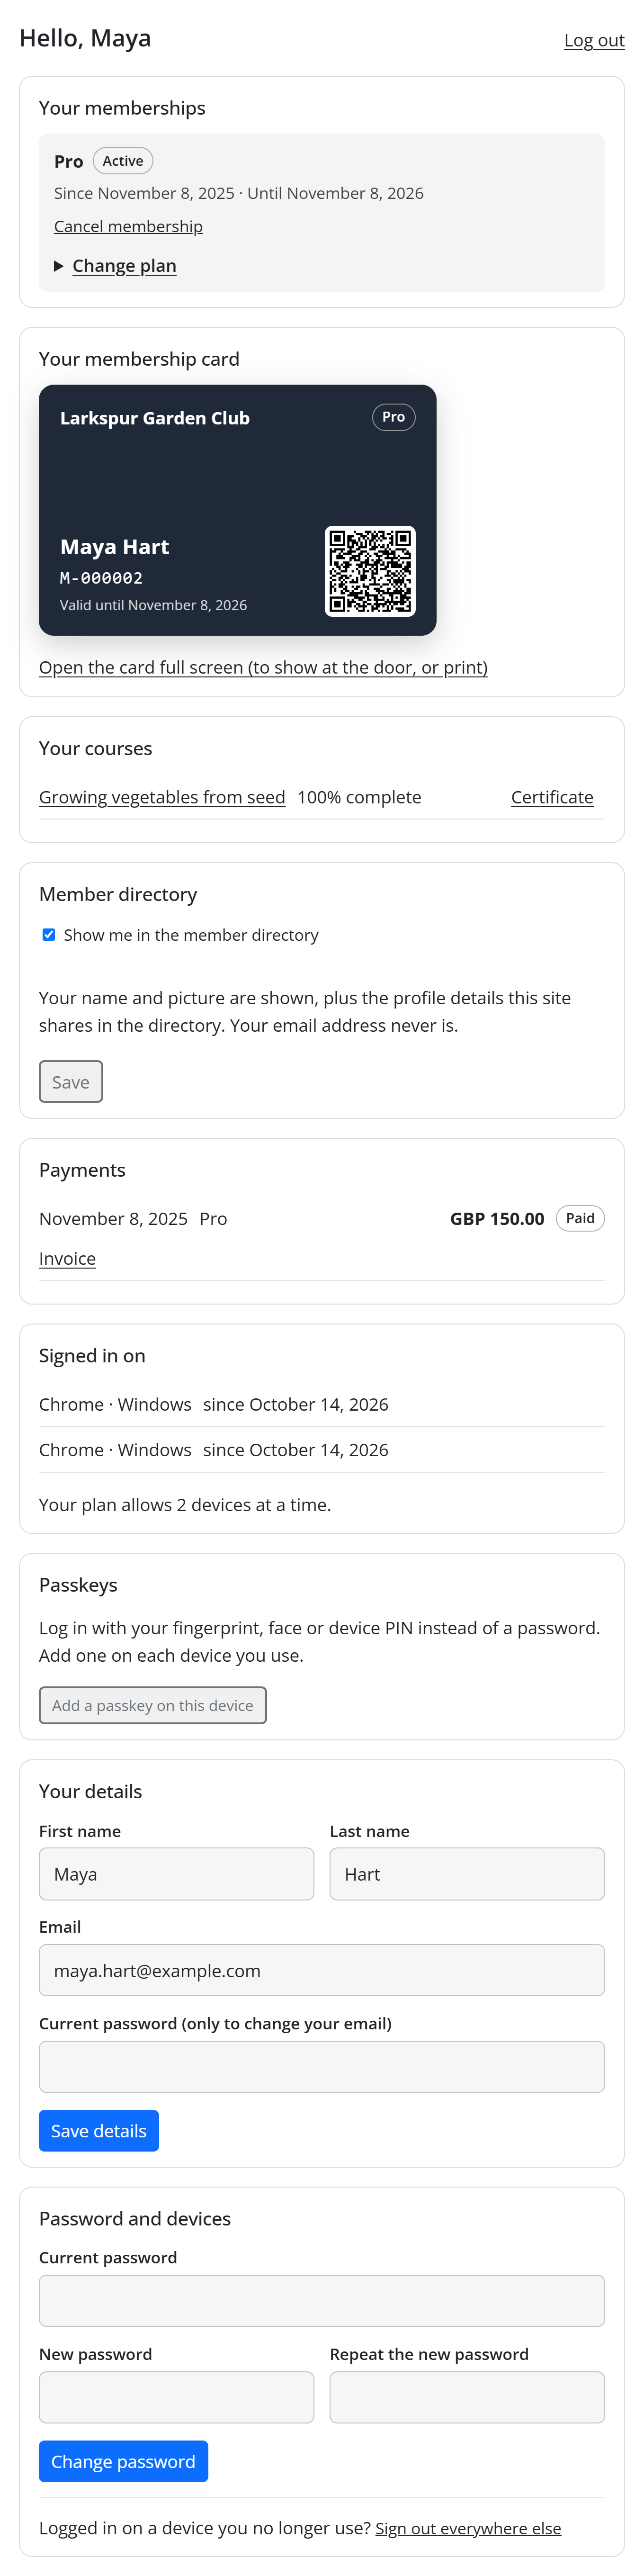
- Create a page called My account and add the Member Account element.
- It shows the member's details, their memberships (with Cancel, when you allow it), and password and devices. Logged-out visitors see the login form instead.
- In "No membership yet" link, put the address of your pricing or sign-up page. Publish.
Tell Membership which pages they are
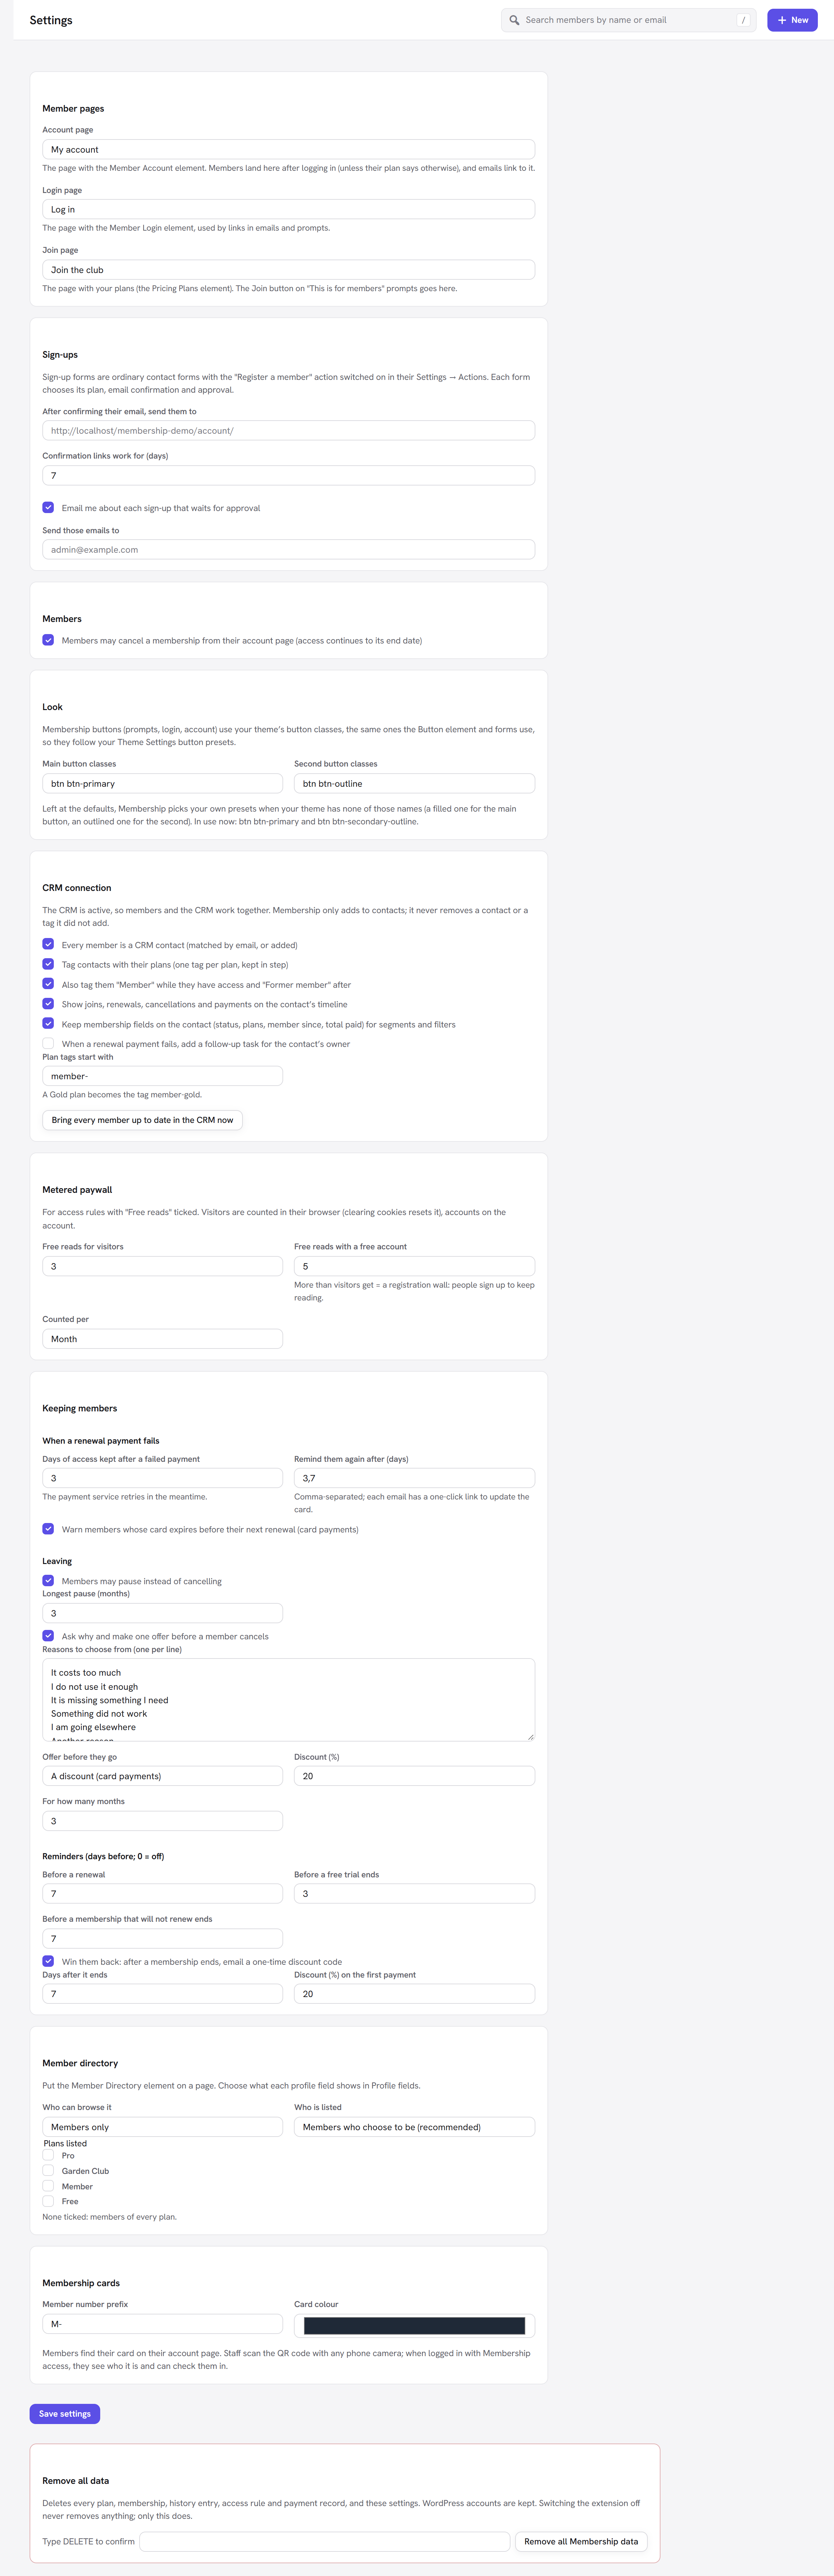
- Open Settings in the Membership sidebar.
- Under Member pages, set Account page to My account and Login page to Log in.
- When you have a page with your plans on it (the Plans page with the Pricing Plans element, built below), set it as the Join page too. You can come back and do this once the page exists.
- Click Save settings.
Members now land on their account page after logging in, and every email and "Log in" button links to your own login page instead of the WordPress login screen. The Join page is where the Join button on a "This is for members" prompt sends people. Left on None (the checkout, when only one plan unlocks it), the button goes straight to the checkout when exactly one paid plan opens the content, and is left out otherwise. (Do not confuse it with the free sign-up page called Join below: the Join page is meant for your plans page. On a site that only has a free plan, though, pointing it at the sign-up page works well.) Every option is in Settings.
A sign-up page for the free plan
Sign-up forms are ordinary Unyson+ contact forms:
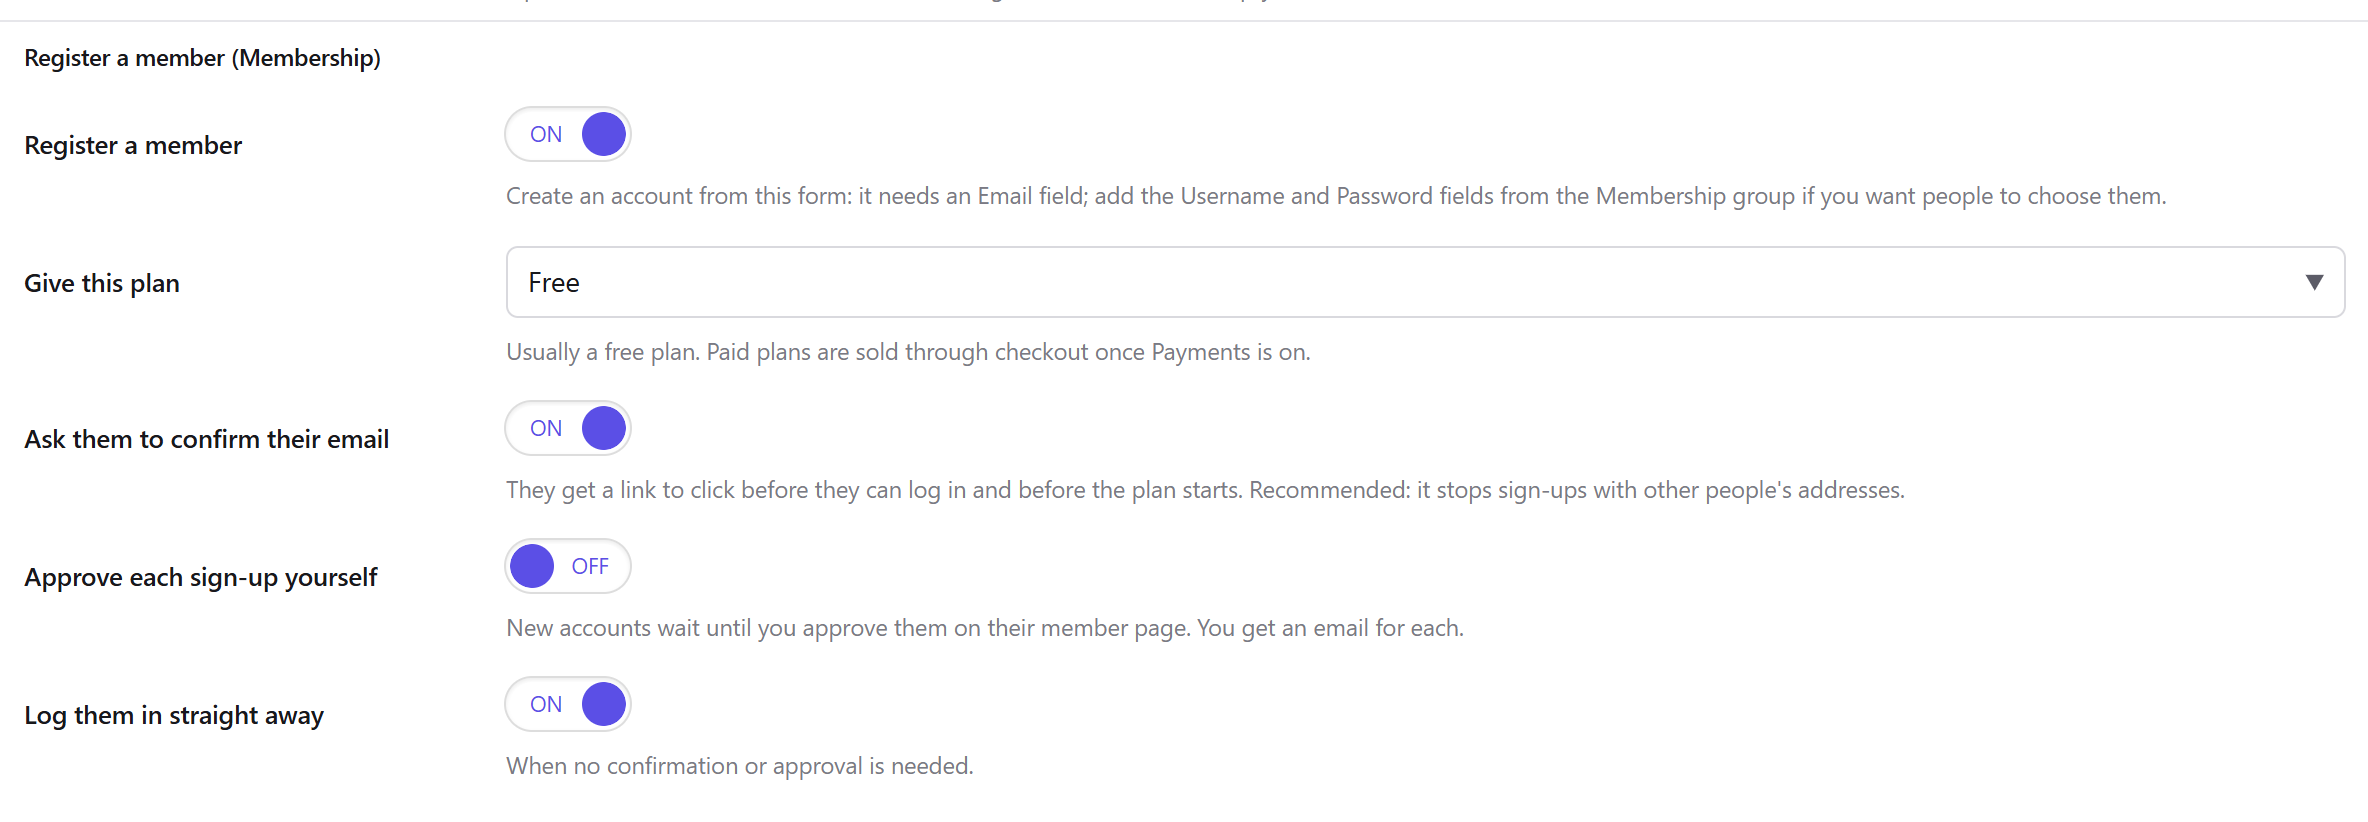
- Create a page called Join, add a Contact form element with an Email field (and a name field if you like). Add the Username and Password fields from the form builder if people should choose them; otherwise they get an email to set a password.
- In the form's Settings → Actions, switch on Register a member and set Give this plan to Free.
- Keep Ask them to confirm their email on: it stops people signing up with someone else's address.
A pricing page (for selling plans)
The Pricing Plans element shows your plans side by side with a Join button, and a monthly / yearly switch when the plans have both. Its buttons go to a checkout page, so it needs the Payments module:
- Switch on Payments under Modules (step 7 below).
- Create a Checkout page with the Membership Checkout element, and choose it in Payments → Payment settings → Checkout page.
- Create a Plans page with the Pricing Plans element. Pick the plans to show (Free and Member) and, in Highlight, the plan to feature.
- Back in Settings → Member pages, choose this page as the Join page and save, so the prompts on protected pages send visitors to your plans.
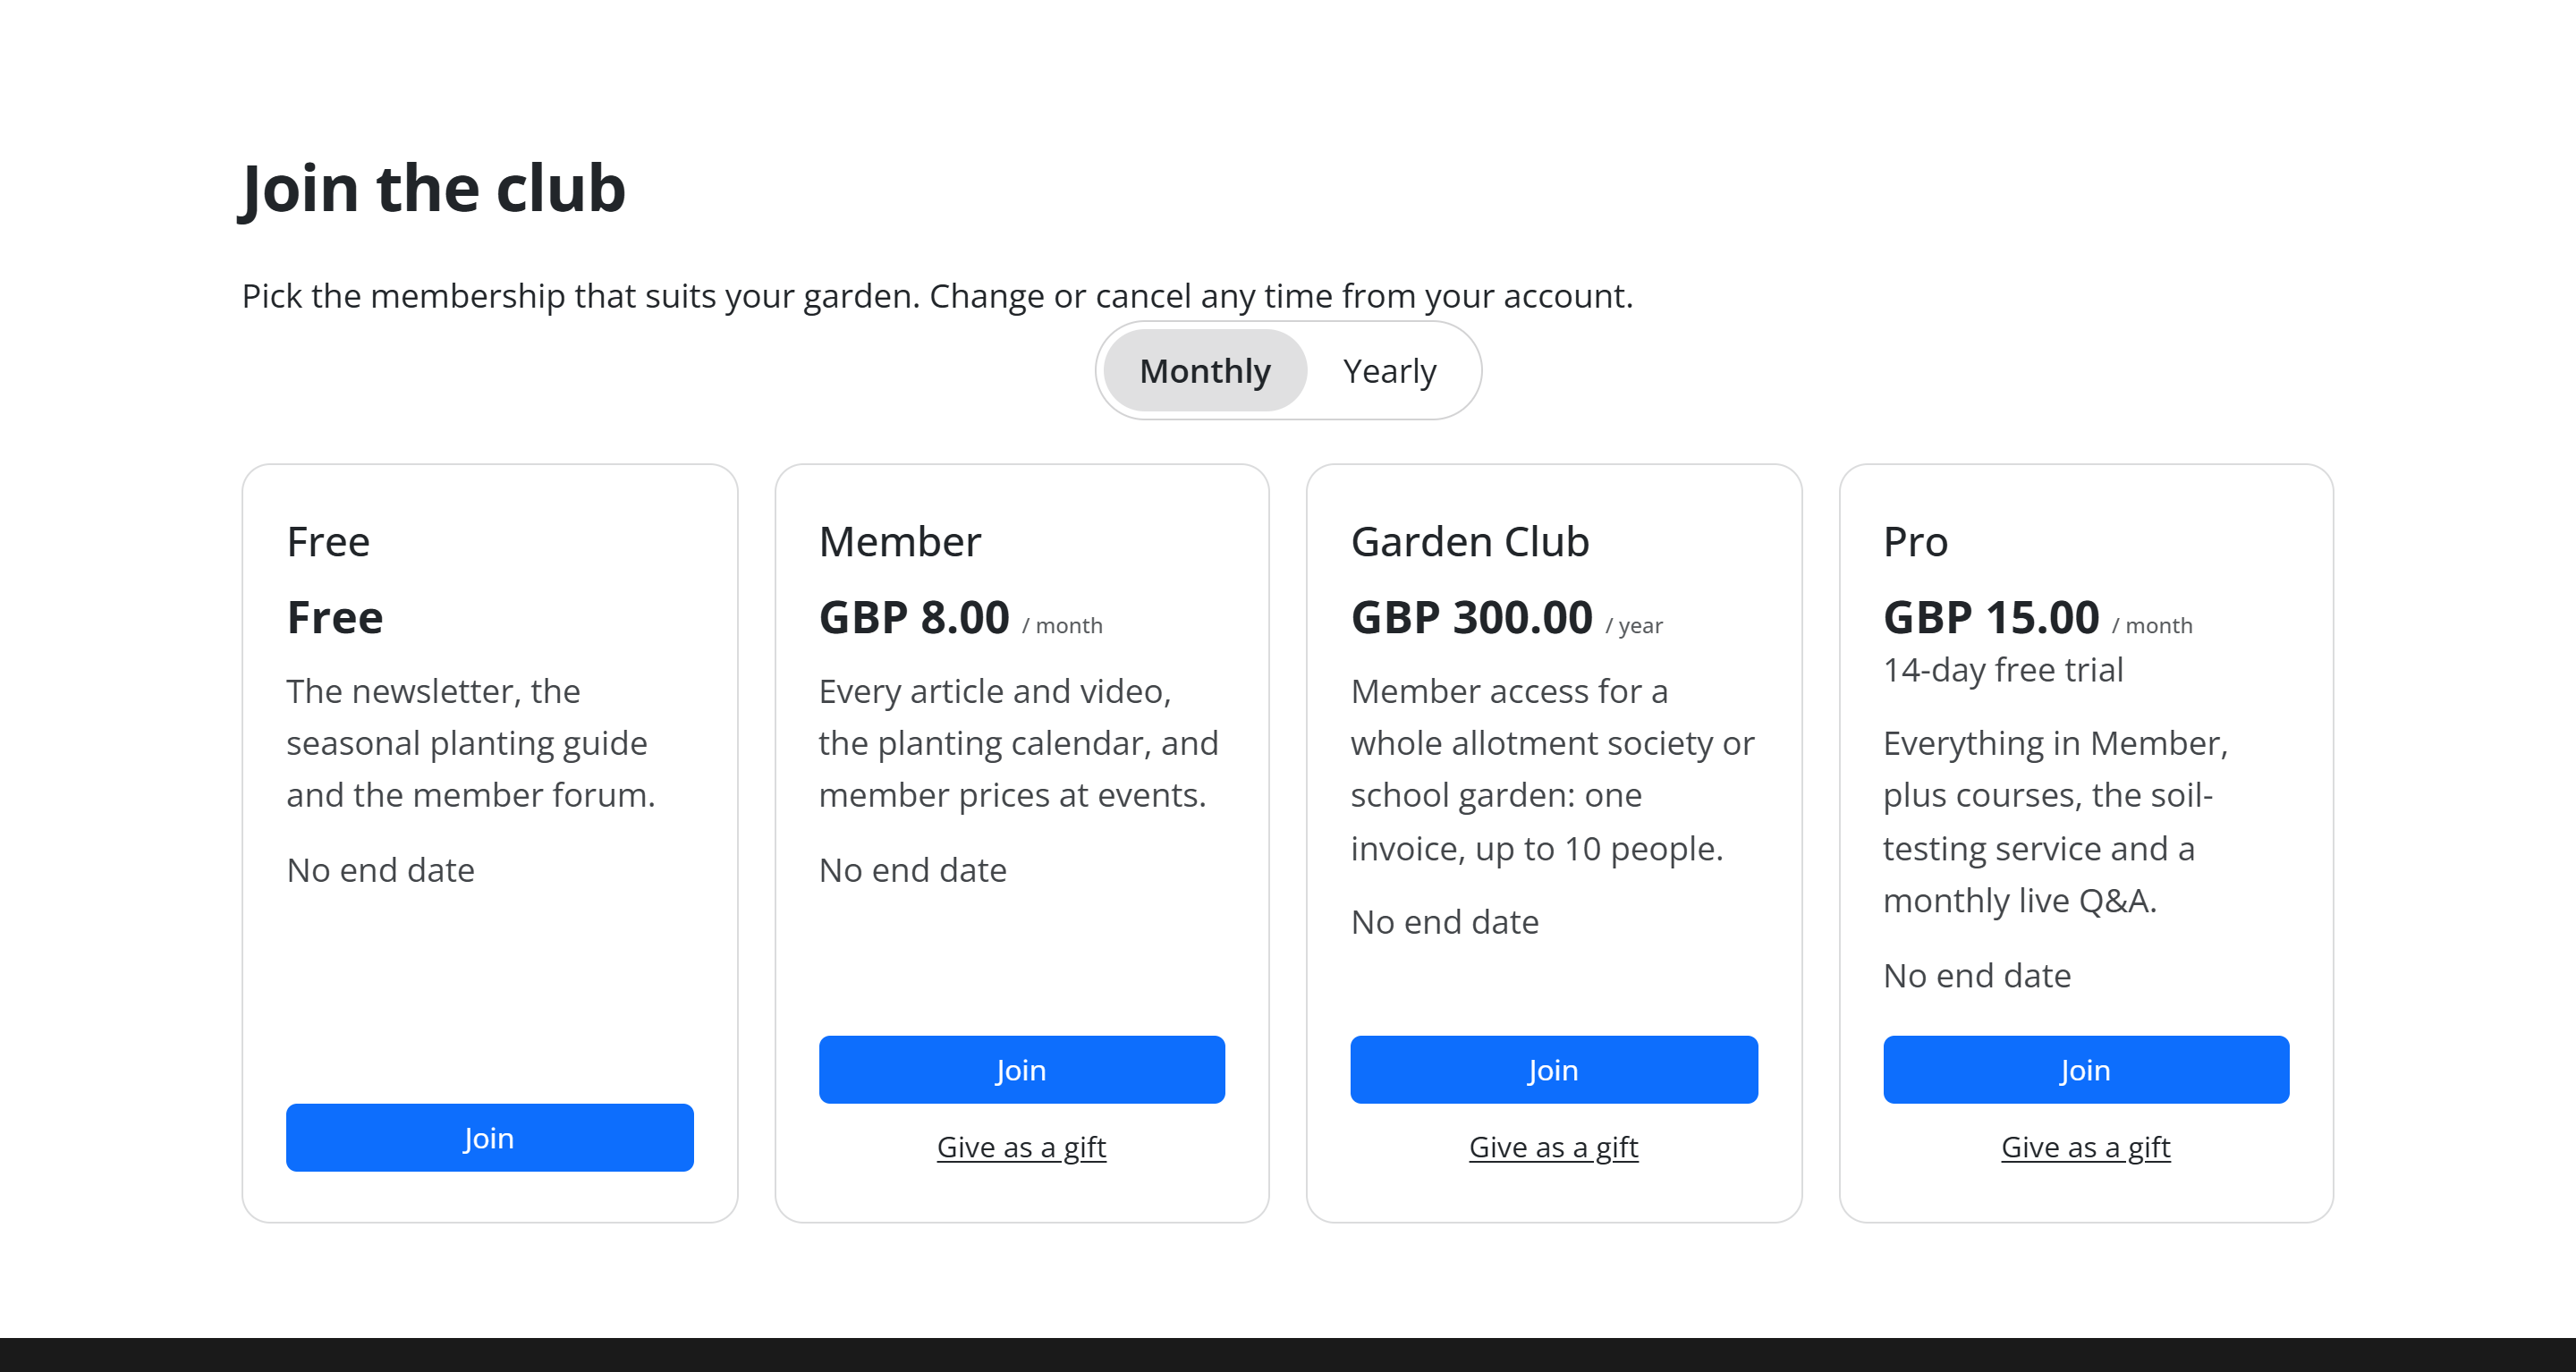
A free plan in the pricing table works too: its button starts the membership at the checkout without asking for a payment.
5. Protect your first page
Say the Garden Club has a page called Members' seed swap that only members should read.
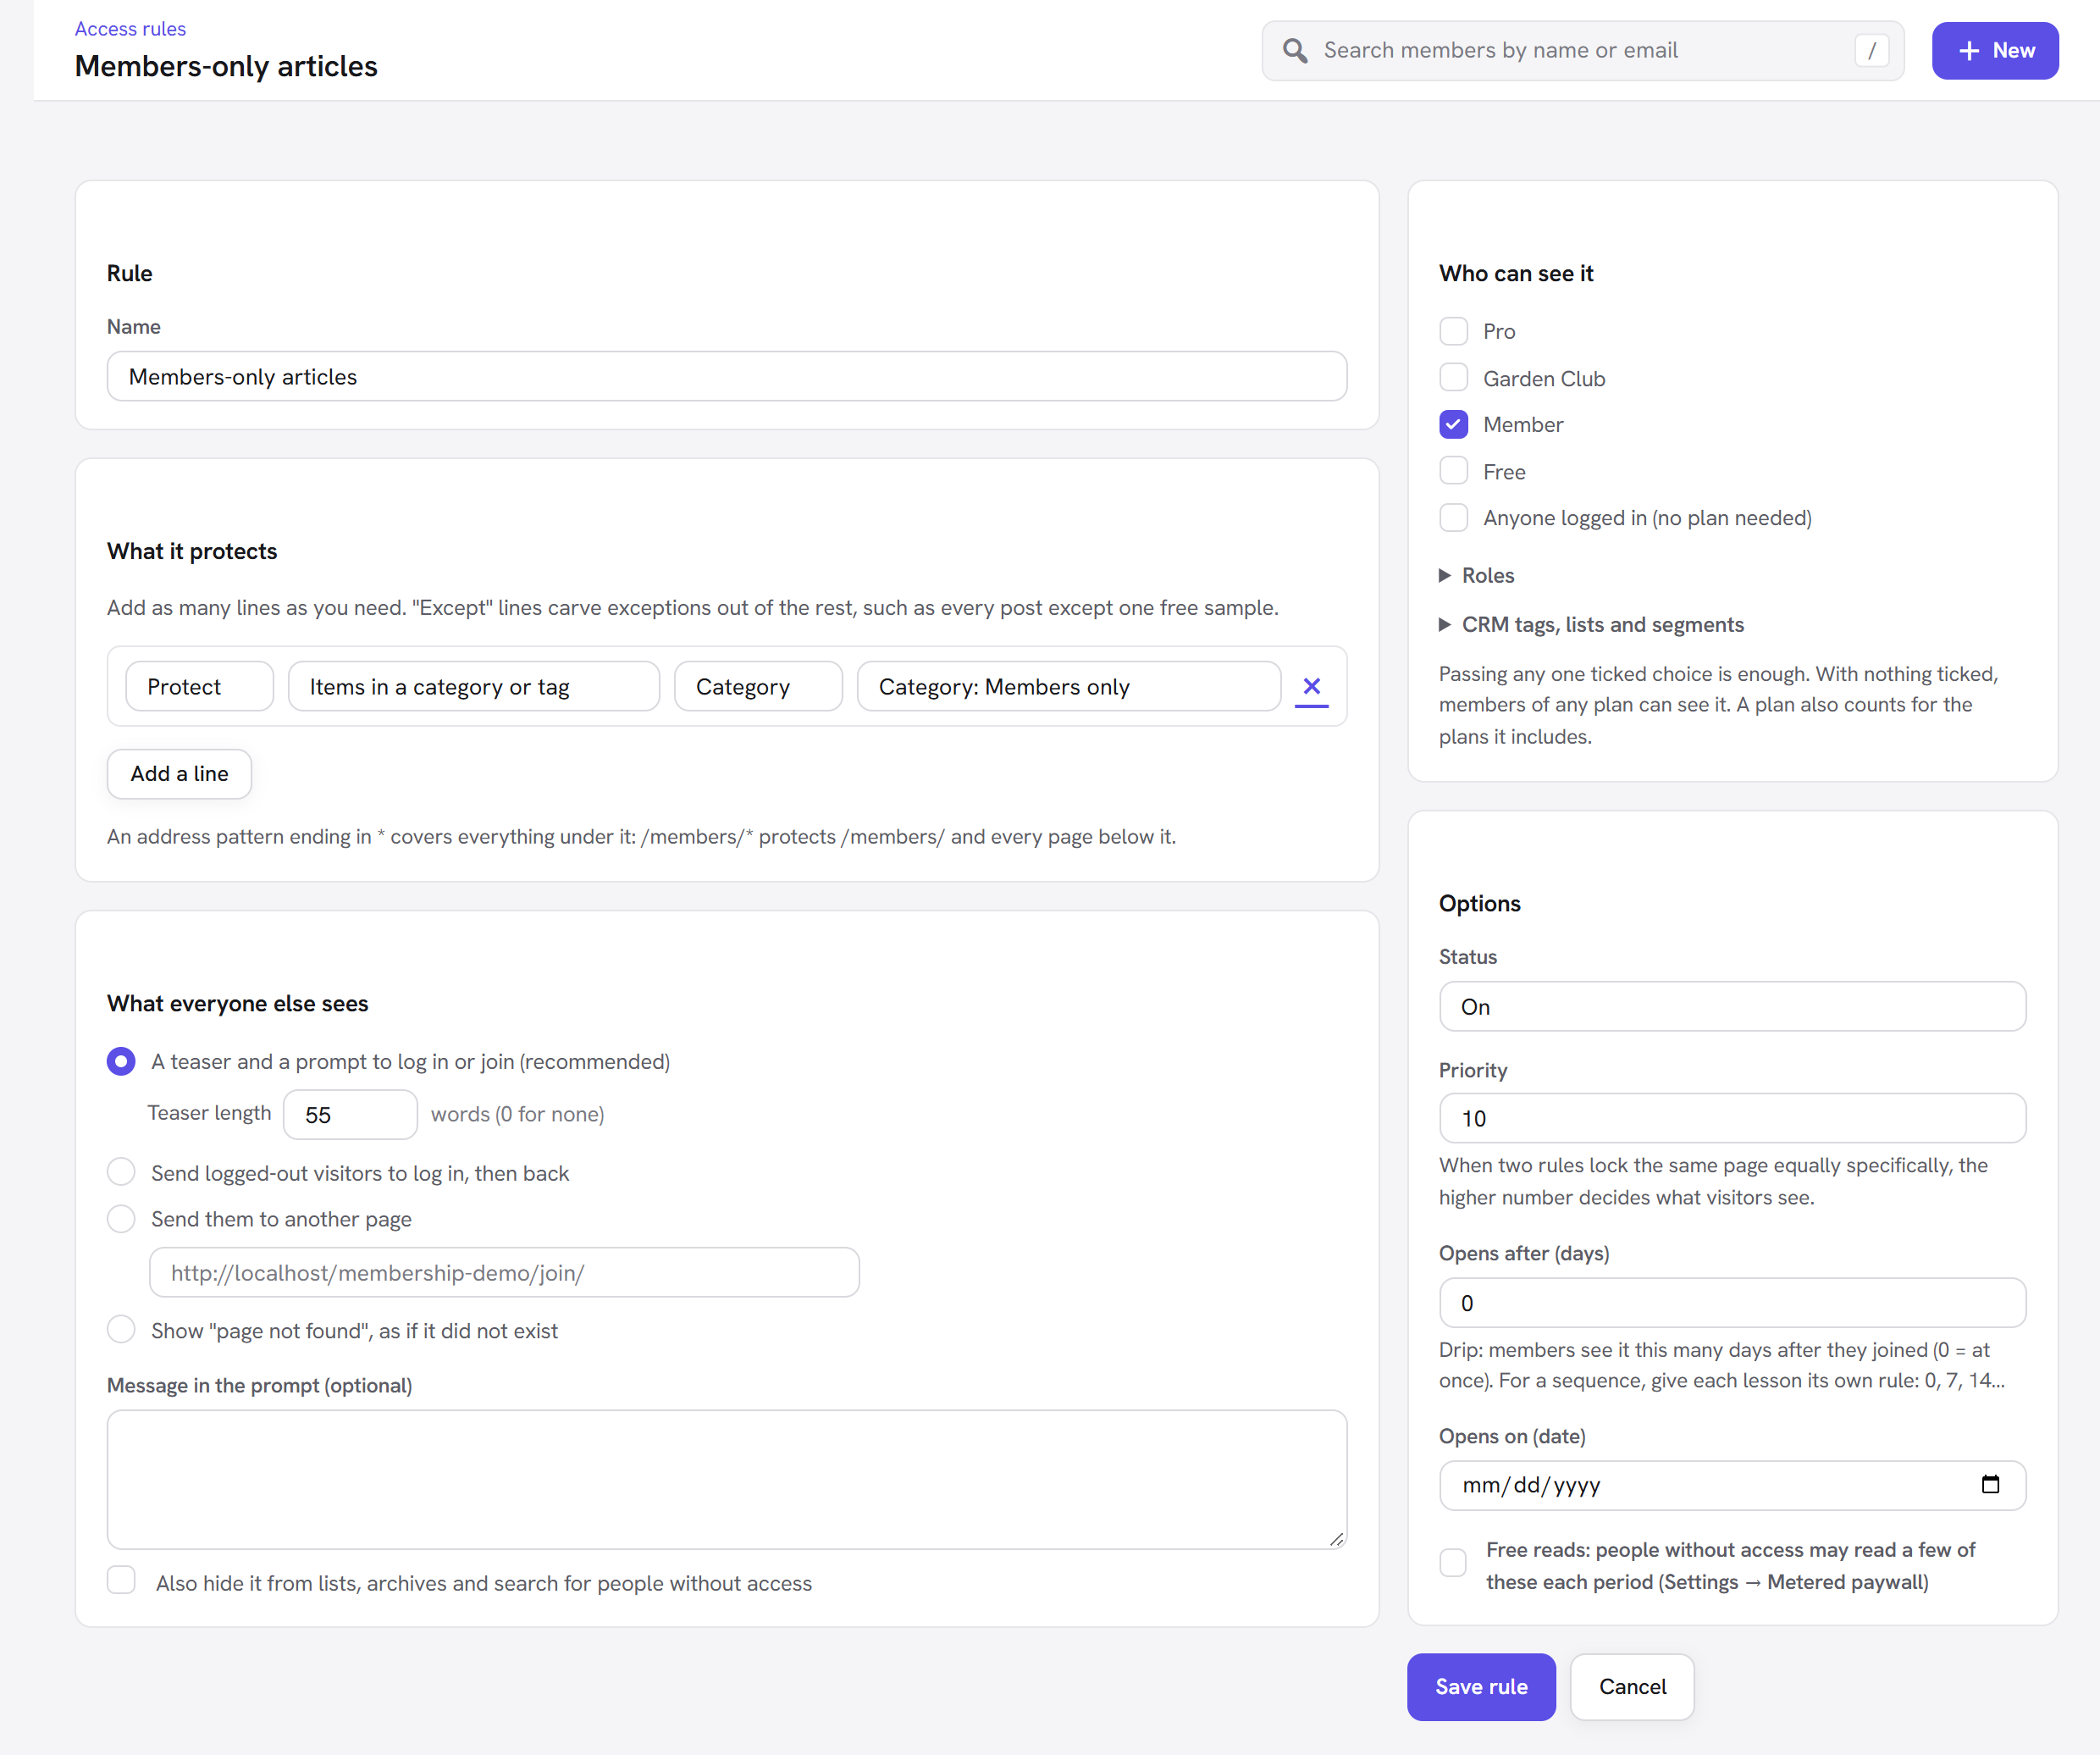
- Open Access rules and click New access rule.
- Name:
Seed swap for members. - Under What it protects, set the line to Protect · A specific page or post, choose Pages, type "seed" in the search box and pick Members' seed swap.
- Under Who can see it, tick Member.
- Under What everyone else sees, keep A teaser and a prompt to log in or join (recommended). The first 55 words show as a teaser, then a box asks visitors to log in or join, with a Log in button and a Join button that goes to your Join page.
- Click Create rule. It works straight away.
There is a quicker way for one page: open it in the editor and, in the Membership box on the right, choose
Members only and tick the plans. Use rules for anything bigger (all posts, a category, everything under
/members/). See Access rules.
6. Test it: "View as" and a private window
As an administrator you always see everything, so a protected page looks unprotected to you. That is on purpose. To see what others see:
- Visit the page on your site while logged in.
- In the admin bar at the top, open View as and choose A logged-out visitor. The page now shows the teaser and the prompt.
- Choose A member of Member: the full page is back.
- Choose You (you see everything) when you are done. While a preview is on, the admin bar shows Viewing as: … in yellow.
<img src="/img/membership/front-paywall.png" alt="A members-only article as a logged-out visitor sees it: a teaser, then the "This is for members" prompt with Join and Log in buttons" width="878" />
For a real test, open a private (incognito) browser window, which is logged out. Then add yourself a test member (Members → Add a member, with a second email address you own) and log in as them in the private window.
7. Take your first payment
To sell the Member plan:
- Open Modules, switch on Payments and click Save modules.
- Open Payments → Payment settings: set the Default currency, the Checkout page, and connect Stripe, PayPal or bank transfer with your own account details. Bank transfer only works for one-off prices: the Member plan's monthly and yearly prices repeat, so they need card (Stripe) or PayPal.
- Make a test purchase from your pricing page in a private window, using the payment service's test mode.
Payments go straight to your own account: Unyson+ takes no transaction fee. The full walkthrough is in Payments and The pricing table and checkout.
8. Switch on what you need next
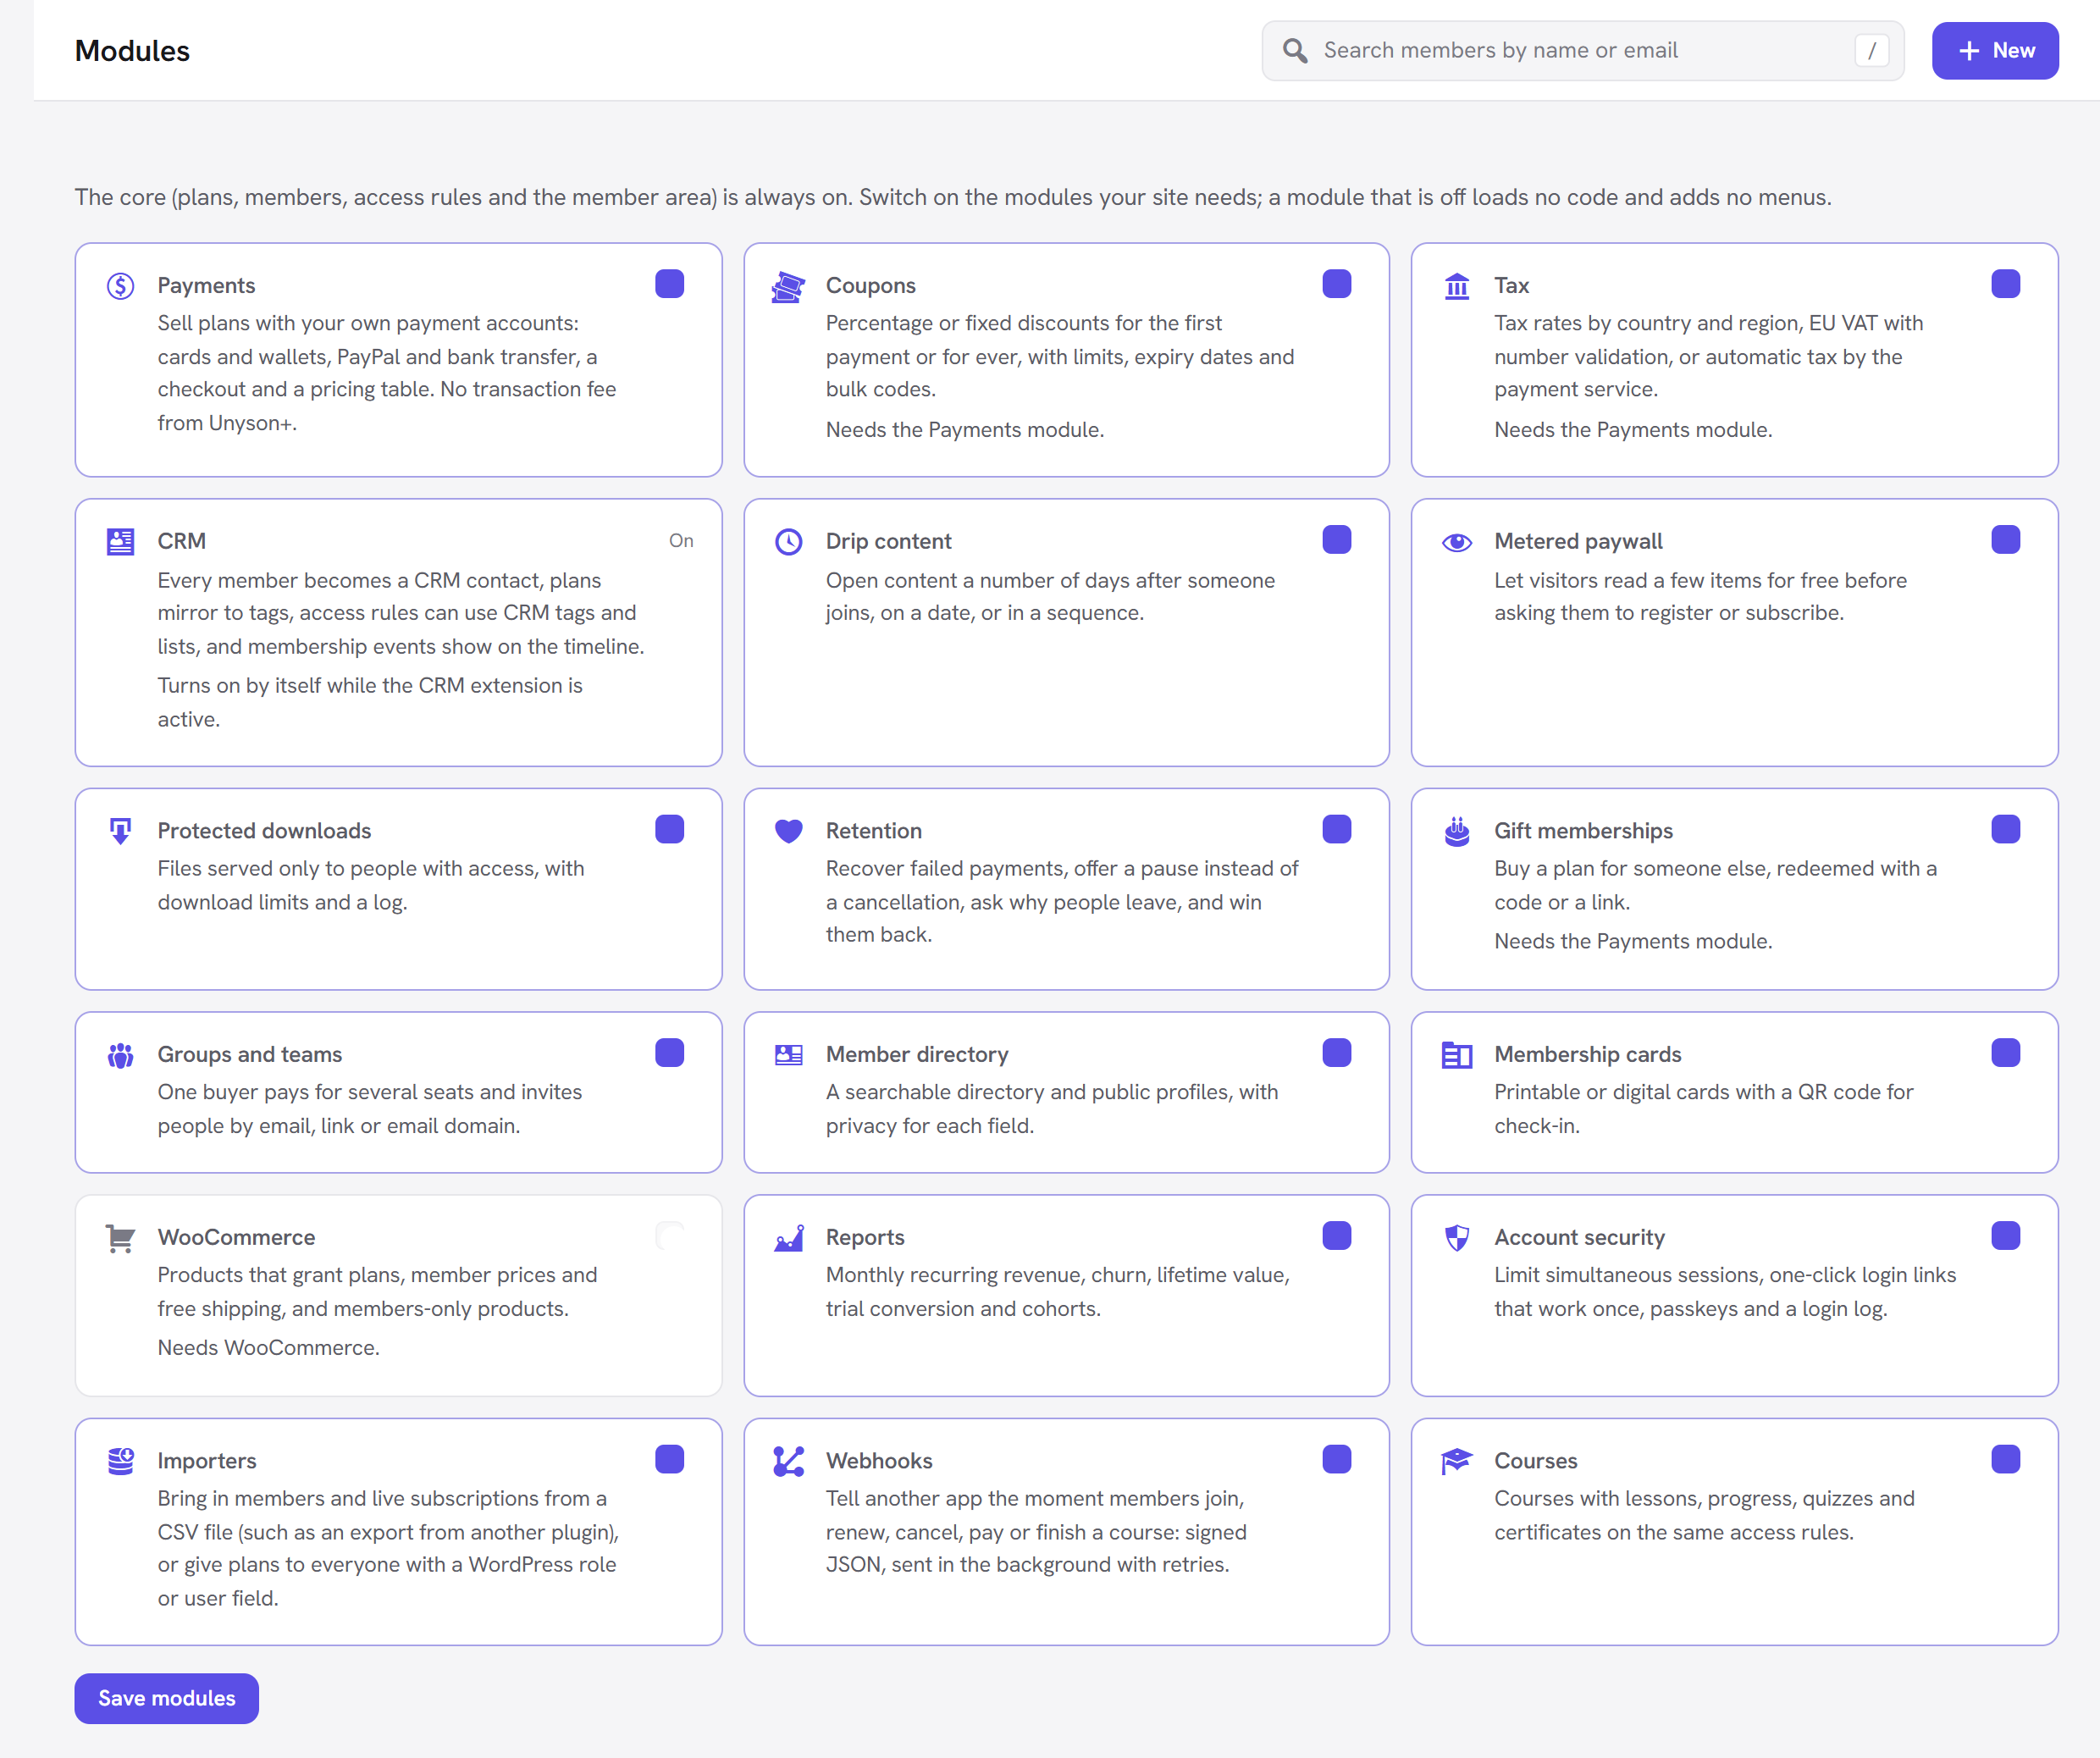
The core (plans, members, access rules and the member area) is always on. Everything else is a module under Modules. A module that is off loads no code and adds no menus, and every module starts off.
| Module | Switch it on to… |
|---|---|
| Payments | sell plans by card, PayPal or bank transfer, with a checkout and a pricing table |
| Coupons | give discount codes (needs Payments) |
| Tax | charge tax and EU VAT (needs Payments) |
| CRM | make every member a CRM contact; it turns on by itself while the CRM extension is active |
| Drip content | open content a number of days after someone joins, or on a date |
| Metered paywall | let visitors read a few items free before asking them to join |
| Protected downloads | serve files only to people with access |
| Retention | recover failed payments, offer a pause instead of a cancellation, win people back |
| Gift memberships | let people buy a plan for someone else (needs Payments) |
| Groups and teams | sell one plan with several seats |
| Member directory | a searchable directory of members |
| Membership cards | cards with a QR code for check-in |
| WooCommerce | products that give plans, member prices and free shipping (needs WooCommerce) |
| Reports | revenue, churn, lifetime value and cohorts |
| Account security | limit devices, one-click login links, passkeys and a login log |
| Importers | bring in members and live subscriptions from a CSV file (such as an export from another plugin), or give plans to everyone with a WordPress role or user field |
| Courses | courses with lessons, progress, quizzes and certificates |
Good to know
- Members are WordPress users. Each member has a normal WordPress account. Plans add access on top; they never change the user's role unless you set Role while a member on the plan.
- Administrators are never locked out. Anyone who manages Membership, and anyone who can edit a page, always sees it. Use View as to check.
- Membership's jobs run on WordPress's scheduler. Ending memberships on their end date, drip emails and reminders run when someone visits your site. On a quiet site, the Scheduled jobs card on Home tells you if they run late and gives you the line to add to your host's cron (see Scheduled jobs and WP-CLI).
A map of this guide
Plans, members and access (the core)
- The Home screen: the numbers, search and the New menu.
- Plans: prices, length, included plans, limits and every plan option.
- Members: the list, a member's page, adding members, statuses and CSV export.
- Access rules: protecting pages, posts, categories and addresses, and testing it.
The rest of the guide
- Sign-up, login and the member area: sign-up forms, the login and account pages, profile fields, emails and settings.
- Selling plans: payments, the pricing table and checkout, coupons, tax, gifts and pay-per-item.
- Content tools: drip content, the metered paywall, downloads and courses.
- Teams, directory and cards: team plans, the member directory and membership cards.
- Reports and keeping members: reports and retention.
- Running your site: modules, WooCommerce, the CRM connection, account security, import and export, scheduled jobs and WP-CLI and privacy and data.
- Back to the Membership overview.